Knitting Made Easier - Turkish Cast On Tutorial
The Turkish Cast-On was recently featured in an article by Meg Swansen in the fall issue of Vogue Knitting.
I found this technique so brilliant I thought I would share it.
The Turkish Cast-On is an invisible cast on that forms a closed end. It is perfect for things like sock toes, mittens, glove fingers, pouches and purses....as I worked it I even thought, "wow this would be a great cast on for the legs and arms of a stuffed teddy bear!"
To work the Turkish Cast-On you need two same sized circular needles. For this demonstration I used two US # 7 (4.5mm) needles - a 24" Addi turbo and a 26" Crystal Palace bamboo so you can differentiate between each needle.
ETA: This technique is easily adapted to the magic loop method, using one circular needle to execute the technique rather than two. However, using two different types of circs as I have for this tutorial does make the technique a bit easier to visualize when first starting out.
STEP 1:
On the bamboo needle make a slip knot.
Hold both needles paralell and in your left hand with the tips pointing to the right and the silver needle on top.Hold the working yarn behind the silver needle.

STEP 2:
With the working yarn behind the silver needle, working left to right, wrap the yarn loosely around both needles.
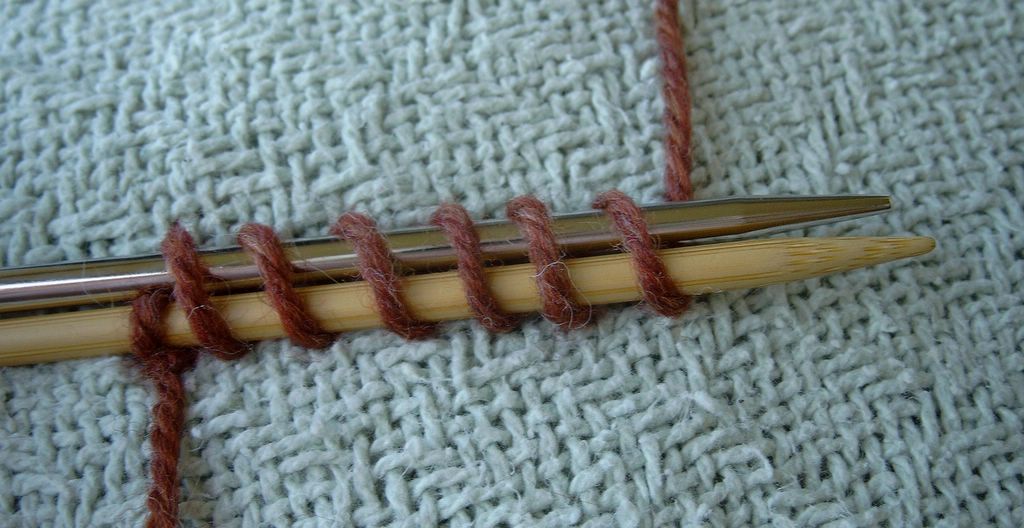
Wrap as many time as equal to HALF the total numer of desired stitches. In the sample below, 15 wraps = 30 working stitches.

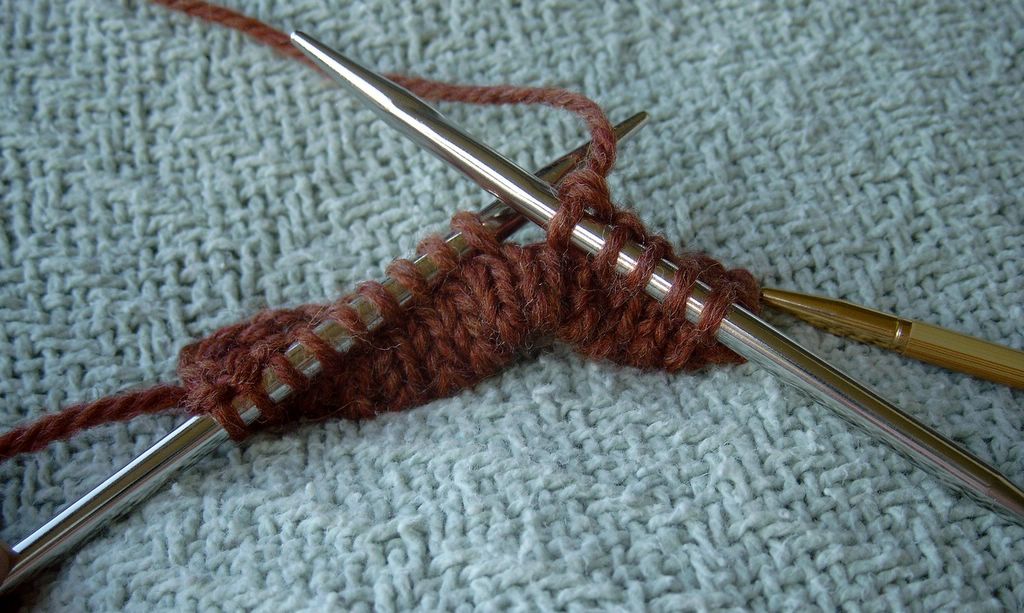
STEP 3:
With your right hand, pull the bottom (bamboo) needle to the right so that the wrapped loops are now on the cable of the needle. Allow the bamboo needle to dangle.

STEP 4:
Grasp the non-working end of the silver needle and bring it up to knit into the loops on the silver needle.

STEP 5:
After knitting the loops on the silver needle, turn the work.
Slide the bamboo needle loops on to the tip of the bamboo needle.

And slide the silver needle to the right so that the loops are now on the silver needle cable and the silver needle is dangling.

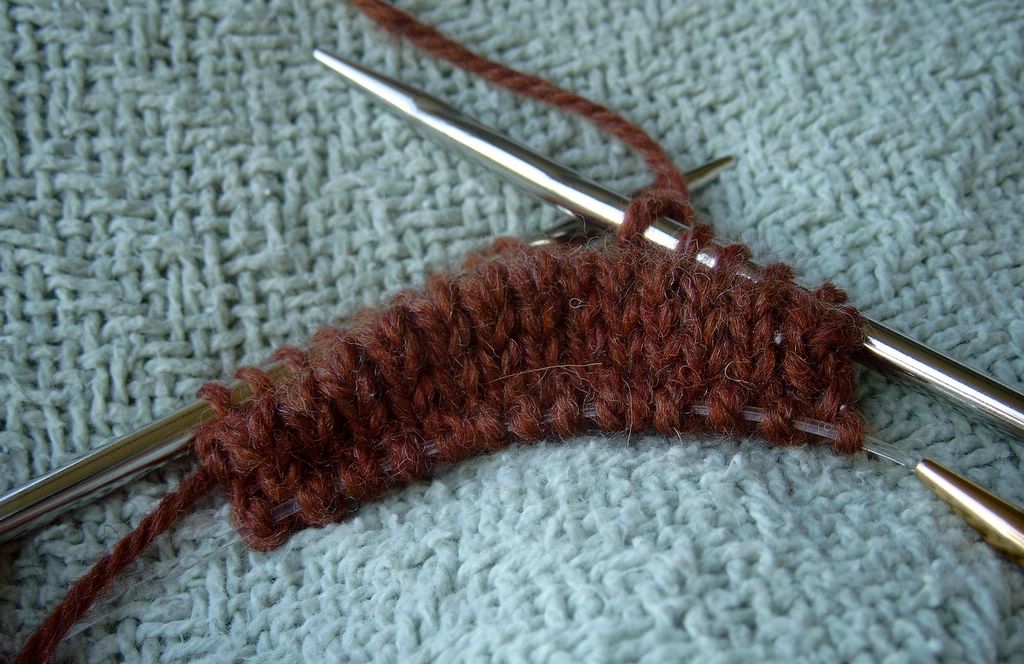
Slide the slip knot off the tip of the bamboo needle and undo it, just allowing it to hang. With the working yarn coming from the last stitch on the silver needle knit across the loops with the bamboo needle.

Step 7:
Pull the bamboo needle thru to the right so the new stitches are on the cable and the bamboo needle is dangling.
Turn.
Slide the stiches to the tip of the silver needle and knit across with the other end of the silver needle.

The instructions may seem a bit verbose and daunting but if you "Just Do It" it's really very easy...get 2 different circs and some yarn and work step by step and it will all become clear once you put the tutorial into actual practice!
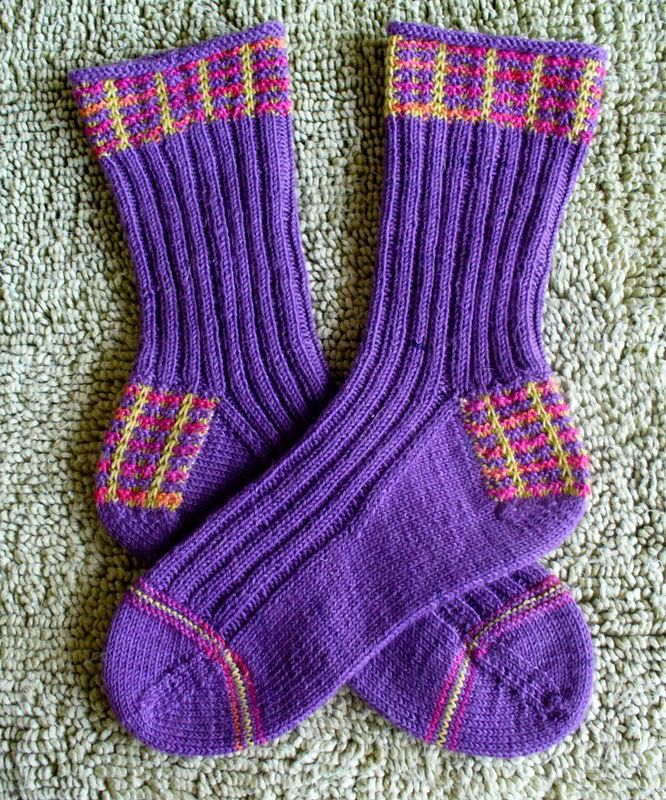
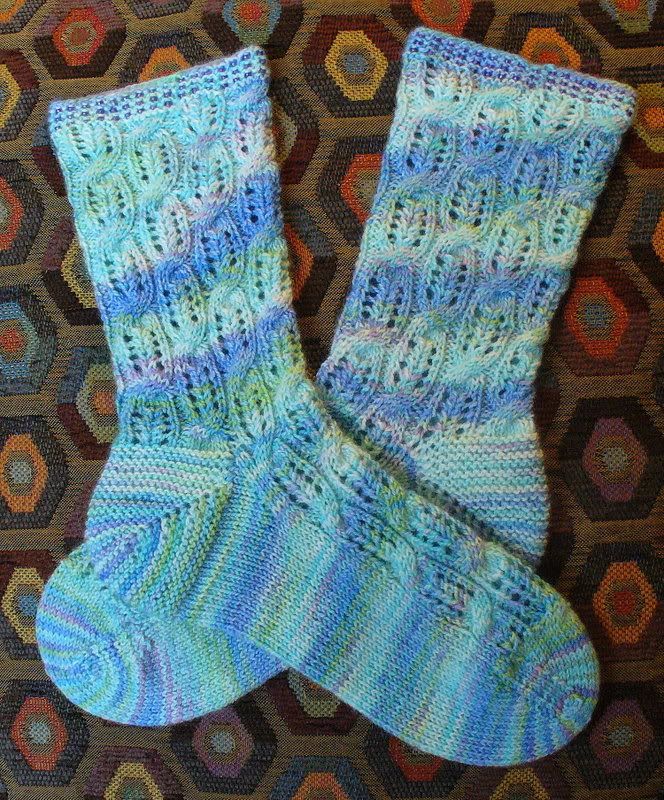
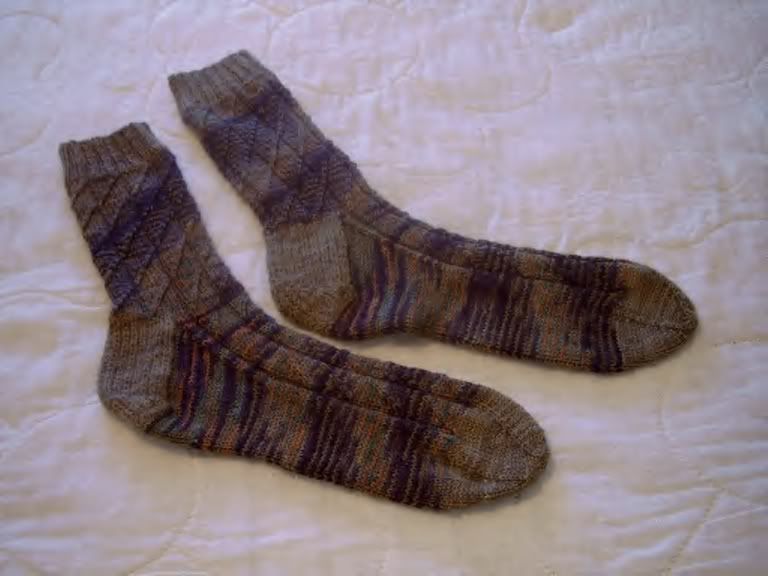
I used the Turkish Cast-On for my toe-up Chervon Lace socks...here's a close up
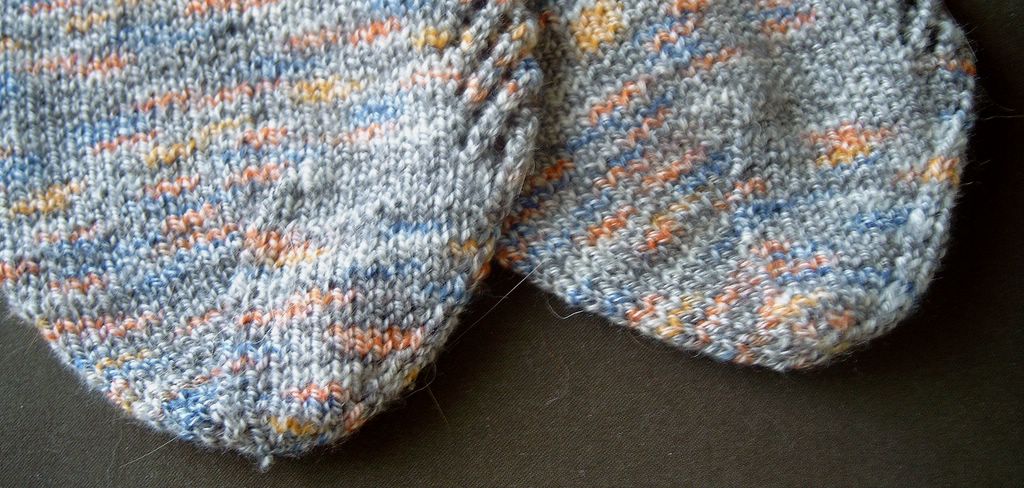
I found the Turkish Cast-On much easier than all the other toe-up cast on's that I've tried and I prefer not having to worry about any waste yarn.
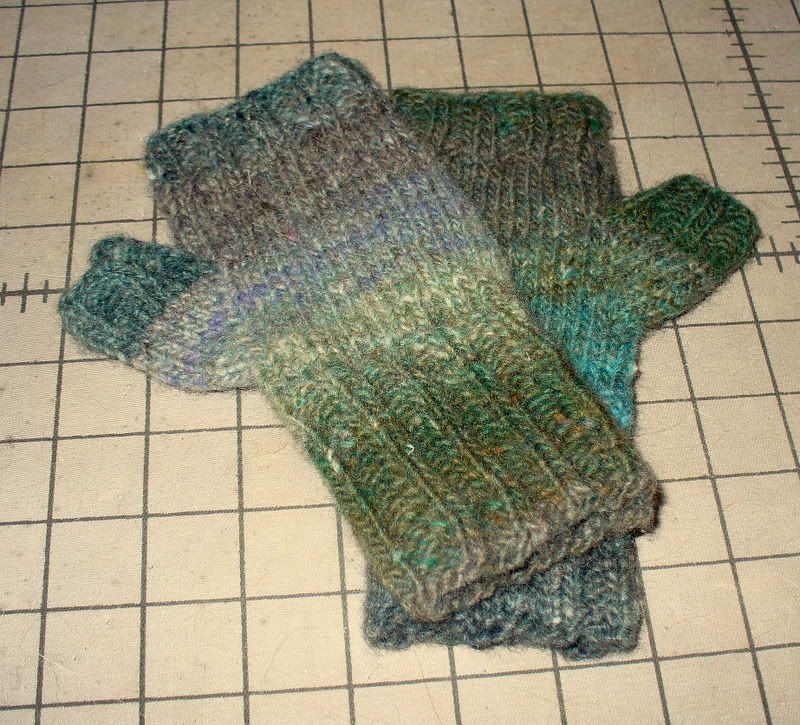
I also used it to whip up this little pouch for a special friend to store her stitch markers in. Notice the seamless construction of the Turkish Cast-On and the lovely Lucet cord :)

I really like this cast on and I see so many practical uses for it....I hope you give it a try and enjoy it as much as I have!
![]()


227 comments:
1 – 200 of 227 Newer› Newest»Thanks again, Debi! I just fall in the sock addiction and was waintig for your tutorial :D
Thanks for the tutorial! I will try it out on my next pair of socks :-)
I love the turkish cast-on. When I first learnt it, I spent days just casting-on, knitting, ripping, and casting-on again. And with each cast-on I would shout nonsensical happiness.
Great pictures too - very well explained.
holy cow! I think I actually get it. I need to try this with some socks. Of course, that means buying more needles. But it's for the cause right? hehe
Great tutorial.
Wow! That is really cool! Thanks for the step by step. That's just the kind of thing I need. A VISUAL.
You did a fabulous job explaining this. I sure am going to try it on my next pair of socks!
Very cool technique - I love having new things to add to my bag of tricks. Thanks for taking the time to do write it up.
Very clever! Thanks for the great tutorial. This looks like it could be easily adapted to the magic loop, too.
I'm going to have to have special notebook entitled "Debi's Tutorials". You have a way of making everything oh-so-clear. I've been getting the urge to make some socks - just may have to do toe-up ones so I can give this a try! Dorothy (Missouri Star)
This is great! I can't wait to use it for christmas pouches (to hold gift cards, etc...) out of leftover sock yarn. Thanks!
You always have the best tutorials, with the most clear pictures. Thank you so much, and give pumpkin a ear scratch for me.
Your tutorial was so clearly presented! BTW, I didn't have two circular needles of the same size I needed, so I just used one to do this cast on and it still worked!
Thanks for reminding me about a cool technique! I was thinking of trying some socks again and I want to try this technique as well. I like the little gift bag idea as well. V timely, for the holidays...
Figure 8 sucks, but I'm OK with the provisional method. The Turkish method looks pretty cool. I'll definitely give it a try. Not today - but at least I'll know where to find it.
Question: Once you've knit the pouch, where do you go from there? Must you stay with two circs? Are there patterns for socks or purses like this? I love the idea of not having to stitch to finish, but I also am confused as to how you continue a pattern.
Thanks so much for a great tutorial.
Maureen
I tried this a while back, and it was actually easy after a few messy starts, but I never did figure out how to take this flat piece of work and turn it into something in the round, such a toe up socks.. do you just knit your work on to DPNs? how did you close up your little bag? did you just fold it in half and seam it up? Its very cute by the way!!
Patti
pattiofurniture_2000@yahoo.com
Is this anything like Turkish Taffy??
Well done re-stating of this fantastic technique. I'll definitely be pointing others to this site for the expanded explanation.
Thankyou thankyou thankyou- I can't readily obtain a copy of Vogue knitting, and have heard how wonderful this cast on is- so thankyou for this little tutorial!
Thanks so much for your tutorial. Your pictures are great which makes it so nice to follow. I have that copy of vogue but seeing your tutorial now I want to try this. Thanks again!
Wonderful tutorial! I'm definitely going to try that.
so, the difference between this cast on and the figure 8 is just that there isn't a twist between the first two rows?
Wow! Great tutorial! Thank you so much!
Stacey
Thanks so much! I read the instructions elsewhere and just couldn't get my brain to cooperate. Your pictures and explaination are great!
Hello fellow Floridian! I'm from So. FL and now living in Austin,TX for 5 years. I miss the beach! Thanks so much for the tutorial on the Turkish cast-on method. You are also a very talented knitter, I enjoyed looking at your FO photos. Thanks again.
Thank you for the step by step directions with very clear photographs. I was going to try following the directions in the magazine but the illustrations always lack something to clarify the written section.
Pat
Great explanation! I just cast on my first toe up using the figure eight method and after reading your tutorial I will be trying Turkish cast on for my next pair. This is possible with Magic loop, right? I'll have to ready back through the comments to see if you've already mentioned it. Again, thanks for posting this great tutorial.
And I found another fun knit blog! Yay!
Thank you so much! I have been preparing to do my first pair of 2 on 2 socks and was wondering how I was ever going to make sense of the suggested cast on's I was seeing. This just made so much sense. Maybe it was the pictures, but this is definately bookmarked and will be what I use to teach my kids how to get their socks started.
Now I'll really have to rush my second sock since I can't wait to try this on the next pair! Thanks for a great tutorial!!
Thank you so much for an excellent tutorial. I'm in the middle of 2-socks-1-circ now. Next one I'll try the Turkish cast on.
Thank you for this wonderfully clear tutorial! I just started a pair of socks on Wednesday, only I used a long circular needle and cast on 2 socks... (I had some practice with another yarn that I decided was not right for the needles)... first I put the slip knot on the needle, wound the 14 wraps that I wanted to start with and then I put another slip knot on & wound the next 14 wraps... THEN I started knitting the socks by increasing 4 stitches on each sock every other round...
I'll do a photo shoot of the process on my blog someday... (weavingrainbow.com/blog)
Cheers,
Jessica
Very helpful tutorial. Can't wait to try the technique.
Looked everywhere for the invisible cast on technique requested in a belt pattern. Yours was the best!!!!! Thank you so much. jg
Debi --
I *love* this cast-on! I was trying to use Figure 8 to make some toe-up anklets, and ran across your blog entry here. I gave it a try earlier this afternoon & was successful the first time. What a *great* and easy way to start toe-ups!
Thanks so much for sharing!
Sorry but my english is very bad, but you need one circular needles size 80 cm. Addi is perfekt to knit two socks.
Bonnmoran in sweden
To work the Turkish Cast-On you need two same sized circular needles. For this demonstration I used two US # 7 (4.5mm) needles - a 24" Addi turbo and a 26" Crystal Palace bamboo so you can differentiate between each needle.
This is great - thank you Debi!
I'll try your cast on with my next pair of socks - and I have always socks on my needles. Also I'll tell my knitting friends on my German blog - they'll appreciate your tutorial too - thanks again and greetings from Southern Bavaria,
Maria
I don't see any way to get to your archives!
Elizabeth
I am teaching a class on toe up socks, two at a time on one 40" needle. I am wondering if it's OK to reprint your wonderful tutorial on the Turkish cast on to give out to my students. Email me at letsstartknitting@hotmail.com. Thanks Sue
Would love to see your archives but it seems you have them invisiable to the public. Try changing your settings for your blog.
Hi Deb,
I have used this cast-on in classes and I wondered how you handle the slip stitch. If you knit into both sides of 15 wraps and the slip stitch, you get 31 stitches. Do you simply fudge and knit them together on the next round or do you really only wrap 14 and a half times to get an even number of stitches?
Thank you for this tutorial - this cast-on technique has me so excited! I've already made a few dolls with it.
Thank you so much for making this information available! I have heard the term "Turkish cast-on' bandied about, but never before have I found any actual instructions with it. I will definitely be trying this out for the next pair of sock...just finished grafting the toes of the first of my 6th pair the other day and it was the FIRST time I was able to graft satisfactorily (i.e., not all mountains and valleys appearance on the toe). But this technique has me very intrigued. Thanks again for the tutorial.
Now that I've tried this technique using your excellent photo tutorial, I'll never go back to doing it any other way. This was easy as freakin' pie. Thank you so much for taking the time to post this!
Hi, how do I find your tutorial on the turkish cast on?
Diana
Visuals are the absolute best and I will be casting on shortly to test how well I follow your smooth directions; I will let you know how it works out.
Way Cool
How do I find your Archive for October 21, 2005?
Can't wait to try this cast-on. Thanks for tutorial. Love your socks!
thanks for such a nice explaniantion and cool pics. i will surely try this on my next project
Thank you for the tutorial. I love it.
Micheleknits
I just wanted to thank you for this tutorial! I used it to make this clutch purse, and I just LOVE the method now!
Debi, those are the best pics I've seen in a tutorial! Thanks so much :D
Thanks for bringing this back up. I missed it the first time around. It looks really interesting.
What an awesome tutorial! I'm thinking of starting some toe-up socks once I get some yarn spun-up and this is just what I needed. Thanks so much.
I know you posted this a really long time ago but I wanted to say Thanks for this great tutorial. Clearly explained, great photos, easy to understand. I mastered the technique on the first try.
Thank you, thank you, thank you! The Turkish cast on made me love toe up socks even more. I was ready to stab itty bitty knitting needles into my eyes after dealing with the fussy figure 8.
Thank you , So much .. I love this cast on and it's so easy after your step by step explanation and pictures.. thank yo so much
Awesome tutorial!
Fan-flippin-tastic tutorial!! So simple, so "why haven't I learnt this earlier?"!!!!
Thanks a billion for feeding my sock-knitting addiction by showing me such an easy toe-up cast-on!
Cheers!!!
HEY Debi! you're famous! You're mentioned in the latest Stash n Burn! Episode 37! Way cool!
This was so helpful and really made sense once I tried it! Thanks for taking the time to put it together!
You. Are. Awesome. I have been DYING to do a toe-up sock, and read about it, but just couldn't picture it. Thank you SO much for taking the time to do this. I get it now. You rule.
Wow... i really want to try it. Thank you so much for sharing.
hugs,
thata
many thanks for that, I've just successfully managed the Turkish cast on after following your instructions... I failed miserably at the previous 3 attempts from 3 other different instructions for this cast on!!!!
Great method and tutorial. Thanks much.
Thanks for a great tutorial. I've learned a new technique today!
Help. Can someone help me I don't understand step4. How do you "knit into the loops???
Thanks so much for this tutorial! I am now going to try your seamless version of Saartje's Booties - this was so easy to follow - and I have bookmarked it for future reference and to share with friends!
I love using two circs and dpns - hate seams - and make most of my baby things top down - so this cast on is brilliant!
Yvette in Oztralia
I've done this cast-on before but could not get it this time. Something in this tutorial made it click. Thanks!
After trying other tutorials, I always come back to this one. It is now listed under GO HERE FIRST in my favorites. It is very easy to understand and works everytime. Thanks for sharing with us.
Wonderful tutorial! Just what I was looking for! I have bookmarked this in case I need to use this very easy cast on again. Thank you very much.
Thanks so much for doing this. Your explanation and pictures are very clear! I've got your site bookmarked for every time I do this cast on.
i'm old at socks, new at toe up. love the turkish cast on--just did a toe this way tonight. thank you so much!
I am an old sock knitter,toe up for a couple of years . I love this seamless cast on better than any I have done yet. You did a great job explaining and visual as well ... sure helps a senior get it much faster. Elsie
This is great. thank you very much. Trying my first toe-ups with the Bacchus Socks pattern from Interweave Knits Fall 2008. Their explanation is lame.
It really is a "just do it" method - thanks for the great explanation.
Thank you so much for posting this! I have tried several times to understand how to do this, but could never comprehend the whole process. Your explanation makes it all make sense! Trying this on my next pair. Well done!!
Thank you so much for your clear, easy to follow directions for the Turkish Cast-On. I only wish all pattern writers could do the same.
KatiesMama1 on Ravelry
Great instructions...one question. Where is the slip knot--is it counted as a stitch?
many thanks for this. was pointed here from ravelry when i was asking for the construction of toe-up socks - loved this tutorial. although i am a newer knitter and english is not my ative language, it was clear and produces great results!
i've been knitting for ages, but never came accross this method before. it's great! thank you for explaining and sharing.
again - thanks. i have used it for socks and decorative objects and loved it. will be usint it a lot more.
Debi you are truly admirable. Always put the tutorials are really useful and beautiful creations are generated. many thanks
Tara Spencer
Hi Deb.
This is so much fun. I made the little pouch. I practised first using a heavier yarn. So, seeing the yarn was the same shade of blue as your pouch I just had to make it. I crocheted a little ruffle at the top. What a lovely cast on. I am now doing the Keegle No Hole No Hassle Sock using the Turkish Cast on. It's lovely. Thanks so much for taking the time to teach some great lessons. Dorothy Janet
follow the step was great, I loved the result, mine were very nice, thanks for sharing all this with us
This is really fantastic and remarkable one
Thank you so much for the detailed instructions and pictures. I haven't knit toe-up socks yet (love top down), but probably will a some point. Will definitely give this a try!
Thanks so much for this - I had been struggling to understand the Turkish cast-on instructions given in a book for about an hour and a half before it occurred to me to google it, and with your instructions I managed the cast-on within about two seconds!
This is great. Once I got started, I realized it's like the Magic Loop method but with two circulars. I've also learned that if I have two short circular needles, I can do the Turkish cast on and keep on going with the two needles. Thanks so much!
This is very nice explanations. Very Good!
Thanks so much for the tutorial. It was very clear and it really helped to have both the words and the pictures. Now I just have to "do it"!
Thank you so much for this clear tutorial - I can't wait to try it out!
Deb. I have more luck with this tutorial. I have used it since you first posted it along with Judy's Magic Cast On. I know it's something I am doing wrong with the working yarn and the non-working yarn. I must twist it the wrong way on one end but I always get an ear. No worries with the Turkish Cast On. I too print out your tutorials and keep them in a binder so I can have it at hand, especially when I have my 79 year old memory blanks. After years of knitting from the top down socks there is nothing like the toe-up socks. Thanks for getting me started.
Deb. I hope I haven't posted this a second time. My 79 year old eyes have trouble with the funny words.
This is a belated thank you. I have used your tutorial for years now. I also made the little pouch, what a great practise piece.
I too, print out your tutorials and
keep them in a binder. You got me started on the toe-up socks after learning the Turkish Cast On. Your tutorials are so easy to understand. Again, thank you.
Saved my sock monkey hat muzzle for my grandson. Thank you! Great tutorial that I will use again.
good post
Thanks for sch a simple pattern that you have mentioned in your blog , it makes me so easy to make such a pattern for my doll baby.
still i am not expert in this field but still i m going to try this for my doll.
Hygge
top shelf
ak47
blueberry kush
blue cheese
Aurora Indica
weed for sale near me
edibles
indica
hash
master kush
Hi! This is my first visit to your blog! We breed Kittens for sale,Standard ragdoll kittens for sale,munchkin kitten for sale for sale,ragdoll cats for sale of volunteers and starting a new initiative in a community in the same niche. Your blog provided us valuable information to
ragdoll kitten for sale
ragdoll kitten for sale
ragdoll kittensragdoll kittens for sale near me
ragdoll cats for sale
cheap ragdoll kittens for sale
ragdoll kitten for sale
ragdolls kittens for sale
ragdoll cat for sale
ragdoll kitten available now
ragdoll cat for sale
where to buy ragdoll kitten near me
purebred ragdoll kittens for sale
ragdoll kittens for sale cheap
white ragdoll kittens for sale
available ragdoll kittens
ragdoll mix kittens for sale
babydoll kittens
ragdoll cats for sale
seal bicolor ragdoll kittens for sale
christmas kittens for sale
ragdoll cats for sale in texas
calico ragdoll kittens for sale
lilac ragdoll kittens for sale
munchkin cat price
standard munchkin kittens for sale
,ragdoll siamese for sale
munchkin breeders
munchkin kittens for sale
black fluffy kittens for sale
kitten for sale
chocolate brown kittens for sale
kittys for sale
calico munchkin kitten for sale
kittens for sale
himalayan ragdoll mix kittens for sale
ragdoll kittens for sale cheap,
white fluffy kittens for sale
available ragdoll kittens
boston terriers weight. Your 8 week old Boston Terrier won't stay tiny for long!
A full-grown boston terrier can weigh up to 25 pounds. As your puppy grows,
you'll want to encourage good behavior by using positive reinforcement training techniques and socializing your dog around other people and animals.
due to the boston terrier personality, they are known as the American Gentleman, the Boston Terrier
is lively, smart, and affectionate with a gentle, even temperament. They can, however, be stubborn, so persistence and consistency are definite musts when
training.
My spouse and I absolutely love your blog and find most of your post's to
be precisely what I'm looking for. Does one offer guest writers to write content for you?
I wouldn't mind creating a post or elaborating on a few of the subjects you write related
to here. Again, awesome site!
how to buy weed online
where to buy weed online
how to buy weed online
where to buy weed online
how to buy weed online
where to buy weed online
how to buy weed online
where to buy weed online
how to buy weed online
where to buy weed online
how can I buy weed online
where to buy vape carts online
how to buy weed online
where to buy weed online
how can I buy weed online
where to buy vape carts online
how to buy weed online
where to buy weed online
how can I buy weed online
where to buy vape carts online
how to buy weed online
where to buy weed online
how can I buy weed online
where to buy vape carts online
how to buy weed online
where to buy weed online
how can I buy weed online
where to buy vape carts online
how to buy weed online
where to buy weed online
how can I buy weed online
where to buy vape carts online
I absolutely love your site.. Great colors & theme.
Did you develop this website yourself? Please reply back as I'm wanting to create
my very own site and want to know where you got this from or
exactly what the theme is called. Kudos!
teacup maltese puppies for sale near me
teacup maltese puppies for sale near me
teacup maltese puppies for sale near me
teacup maltese puppies for sale near me
teacup maltese puppies
teacup maltese puppies
teacup maltese puppies for sale near me
teacup maltese puppies for sale near me
teacup maltese puppies for sale near me
teacup maltese puppies for sale near me
teacup maltese puppies
teacup maltese puppies
teacup maltese puppies for sale near me
teacup maltese puppies for sale near me
teacup maltese puppies for sale near me
teacup maltese puppies for sale near me
teacup maltese puppies
teacup maltese puppies
https://nextgenerationmaltese.com/availablepuppies/
https://nextgenerationmaltese.com/availablepuppies/
https://nextgenerationmaltese.com/availablepuppies/
https://nextgenerationmaltese.com/availablepuppies/
https://nextgenerationmaltese.com/
https://nextgenerationmaltese.com/
https://nextgenerationmaltese.com/
https://nextgenerationmaltese.com/
https://nextgenerationmaltese.com/
https://nextgenerationmaltese.com/
There are many posts that mean anything which is meaningless, but your post is very different, it is very amazing and is very unmatchable, I enjoyed reading it very much.
call girls in gurugram
Call girl gurugram
Gurugram reliable escorts
Perfect girls
Very Nice Blog!!!
Please have A Look at:
Sphynx Cats for Rehoming
Sphynx Cats for Sale Craigslist
Black Sphynx Cats for Sale
Sphynx Cats Near Me for Sale
Retired Sphynx Cats for Sale
Hypoallergenic Cats Near Me for Sale
Sphynx Kittens for Sale Near Me
sphynx cat for sale
sphynx kitten for sale
Yorkie Puppies for sale
Yorkie for sale
I will be honest these is the most useful tips I have read till date. Thanks for putting all this together. As a newbie blogger, I am going through different stages of learning and all ups and downs what a normal newbie blogger face. But the most important thing I am not giving up and holding it until I find success. I am really positive using your thoughts and knowledge will help me to improve myself. Siberian husky Puppies For Sale Great work. Keep doing this great work for us. Loved it.
Cockatoos For sale
We are professional breeders.We have Cockatoos For sale,Cockatoo Parrots For Sale,Blue And Gold Macaws For Sale,African Grey Parrots For Sale,Hyacinth Macaws For Sale,Green Wing Macaws For Sale,Scarlet Macaws For Sale,Toucans For Sale.
http://cockatoo.company.com/
Cockatoos For sale,Cockatoo Parrots For Sale,Blue And Gold Macaws For Sale,African Grey Parrots For Sale,Hyacinth Macaws For Sale,Green Wing Macaws For Sale,Scarlet Macaws For Sale,Toucans For Sale,
http://cockatoo.company.com/about.html
http://cockatoo.company.com/contact.html
Hi, my names is Shawn am new here and I would be needing help from you guys. My Late Dad was a Yorkie and Kitten pet breeder, he started breeding sphynx kittens ?? when I was 15 years old and he named the small cattery after me, "Shawn sphynx Cattery" cheap sphynx kittens for sale. He has been breeding for 13 years before he passed away and before he died he asked me to continue running the cattery. So I contact some of the registered sphynx breeder for advice, they told me I need to build a website to advertise the Liter I have available so I did that. Here is the website I built yorkie puppies for adoption please you guy should review and advise me on what to do please ?? I need more advice from you on what to do
Superior post, keep up with this exceptional work.
It's nice to know that this topic is being also covered on this web site so cheers for taking the time to discuss this! Thanks again and again!
Yorkie Puppies for sale
Teacup yorkie for sale
Its so refreshing to see a post that talks straight to the point. thanks so much for writing about this it has really helped.
Weed for sale
buy weed online
buy codeine online
buy actavis cough syrup
buy ketof online
promethazine codeine syrup
buy tussionex cough syrup
wockhardt
wocklean
wocklean discount code
buy wocklean online
premiumlightsupplier
buy adderall online
buy celexa online
buy hydrocodone online
buy Percocet online
buy Suboxone online
buy valium online
buy Vyvanse online
buy Xanax online
premiumlightsupplier
A good post is always beneficial, as your post is making the same effect. Your post is very knowledgeable. I was quite surprised to see your post that you can see such a good post even today. Hope you You will continue to provide similar posts to us as well. Thank you.
Call Girls In Gurugram
Independent Call Girls
Call Janvi Yadav
Call Girls In Sector 41
Get the best THC and CBD products delivered same-day with Eaze. Shop flower, vapes, edibles, and joints from legal marijuana brands. Free, fast weed.
buy marijuana edibles
buy Dankwoods
weed edibles
buy Dank vapes cartridges
edibles weed
buy organic smart carts
edibles
tko edibles
tko extracts
how to make edibles
tko carts
franken berry
thc edibles
fruity pebbles
nerds rope
incredible edibles
stoney patch
nerds candy
buy kingpen cartridges
buy Cbd edibles
cannabis edibles
buy gorilla glue exotic carts
white runyz
Dank vapes flavors list
Dank vapes official account website
thc gummies
count chocula
sour patch kids
boo berry
f1 savannah kittens For Sale
Kittens for sale online
Serval cats For Sale
Savannah kittens for sale online
Cats for sale
Bengal Kittens For Sale
buy marijuana edibles online usa uk au ca
buy cannabis seeds onlineonline uk usa
buy cbd oil online
buy marijuana flowering stage online usa uk
best psychedelic mushrooms for sale usa uk
buy vape pens for carts-online uk usa
buy weed concentrate online usa uk
Cannabislife-683062215657951
buy sour diesel strain online uk usa
buy jack herer strain online uk usa
buy Girl Scout Cookies strain online uk usa
Hi there,
Thank you so much for the post you do and also I like your post, Are you looking for
CAVAPOO PUPPIES Ashley, CAVAPOO PUPPIES Billy , CAVAPOO PUPPIES Jack , CAVAPOO PUPPIES Jackie, MALTIPOO PUPPIES Lucy , MALTIPOO PUPPIES Meli with the well price and our services are very fast. Click here for
Email: info@cavapooandmaltipoopuppieshome.com
I was asked by a medical doctor Nicola Whitehill to purchase Dr Itua herbal medicine for Scleroderma as June is Scleroderma month. It took a lot to go through and remember that I have been through a lot! I have learned a lot about herbal medicines and my fight to a healthy lifestyle! I have recommended Dr Itua herbal medicines to a lot of people so that they can see that the fight may be hard at times, but it is all worth it! You are worth the fight, so don't ever give up and continue to be your own advocate and you may need to switch doctors to get the best care for your body! Keep your head up and keep moving forward despite the obstacle that you may be on! God only gives you what He can handle, so put your faith, trust, and hope in Him and ask Him to show you the direction in which He wants you to go! By researching and finding what you are putting in or on your body can help tremendously and help you to use Food as Medicine to help heal your gut!
Dr Itua has all types of herbal medicines to cure all kinds of disease such as Herpes,Diabetes,HPV,HIV,Cancers,hepatitis,Parkinson,Infertility and other human disease and infections you may have been going through in your life Dr Itua will prepare you a permanent cure.Dr Itua herbal center email contact: drituaherbalcenter@gmail.com.
Buy Ambien online
Buy Ambien 10mg online
Buy Ambien online overnight delivery
Buy Ambien online without prescription
Buy Tramadol online
Buy Tramadol 100mg online
Buy Tramadol online without prescription
Buy Tramadol online overnight delivery
order Tramadol online
Buy Tramadol online Legally
Buy Tramadol online
Buy Tramadol 100mg online
Buy Tramadol online without prescription
Buy Tramadol online overnight delivery
Buy Tramadol online USA
Buy Tramadol online
Buy Tramadol 100mg online
Buy Tramadol online without prescription
Buy Tramadol online overnight delivery
Buy Tramadol online Legally
Buy Tramadol online
Buy Tramadol 100mg online
Buy Tramadol online overnight delivery
Buy Tramadol online without prescription
Buy Tramadol online Legally
Buy Ambien online
Buy Ambien 10mg online
Buy Ambien online without prescription
Buy Ambien online overnight delivery
Buy Ambien online USA
This Website black sattaGood Exprice Never Hate black sattaTo Very
Awsome Jaggie Tvpunjabi song lyrics
Kansas City Mirror Repair
Wasp Exterminator Liberal
Investor Friendly Contractors
Contractors Near Me
Buy My House
High School Fundraising
buy mr nice online
buy white ice moon rock
buy juicy fruit online
buy marathon og Strain online
exotic carts packaging
facewreck
legal psychedelics for sale
buying acdc strain online
backwoods wild n mild
buy liberty caps
Hi there,
Thank you so much for the post you do and also I like your post, Are you looking for buy CAVAPOO PUPPIES Ashley, CAVAPOO PUPPIES Billy , CAVAPOO PUPPIES Jack , CAVAPOO PUPPIES Jackie, MALTIPOO PUPPIES Lucy , MALTIPOO PUPPIES Meli , buy CAVAPOO PUPPIES Queen for sale online, Buy Maltipoo Puppies Stalla Online, with the well price and our services are very fast. Click here for
Email: info@cavapooandmaltipoopuppieshome.com
its been long since i saw a post that's so educative and informational. i will make sure to share this my facebook group. you can also view contents on our websites below.
French Bulldog Puppies For Sale
French Bulldog Breeders
French Bulldog Puppies For Sale Near Me
French Bulldog Puppies For adoption
French Bulldog Puppies
Blue French Bulldog Puppies
playful-puppy
buy-playful-puppies-online
puppies-for-sale
french-bulldog-puppies-in-virginia
french-bulldog-rescue-texas
buy-french-bulldog-puppies-online
french-bulldog-puppies-in-atlanta
rehome-french-bulldog-puppies
french-bulldogs-near-me
how-can-i-get-a-french-bulldog
playful-puppy
buy-playful-puppies-online
puppies-for-sale
french-bulldog-puppies-in-virginia
french-bulldog-rescue-texas
buy-french-bulldog-puppies-online
french-bulldog-puppies-in-atlanta
rehome-french-bulldog-puppies
french-bulldogs-near-me
how-can-i-get-a-french-bulldog
f1 savannah kittens For Sale
Cats for sale
Bengal Kittens For Sale
Serval cats For Sale
f1 savannah kittens For Sale
Cats for sale
Bengal Kittens For Sale
Serval cats For Sale
Nice Blog !
Our team at QuickBooks Customer Service Number focuses on giving top-quality service for QuickBooks even during these trying times.
Hi There,
Thank you so much for the post you do and also I like your post, Are you looking for Mini Corgi puppies for sale in the whole USA? We are providing premium teacup puppies,teacup dogs for sale,yorkie puppies for sale near me,yorkie for sale near me,micro puppies for sale,puppies for sale detroit,teacup puppies near me,mini puppies for sale,yorkie puppies for sale,pet adoption near me,yorkie breeders in michigan,micro poodles for sale near me,havanese puppies for sale near me with the well price and our services are very fast.
Click here for more information
Contact Us:https://www.premiumteacuppuppies.com/
TKO Carts
TKO Extracts
TKO Edibles
TKO Carts
TKO Extracts
TKO Edibles
buy marijuana-indica online
buy marijuana-hybrid online
buy marijuana-concentrates-cartridges-and-weed-concentrates online
buy marijuana-seeds online
buy marijuana-pre-rolls online
buy marijuana-accessories online
buy marijuana-accessories-and-vaporisers online
buy hemp-cbd-and-cbd-oils online
buy hemp-cbd-and-cbd-capsules-weed-concentrates online
"buy marijuana-grand-daddy-purple online
Buy Psychedelic Online l Order Psychedelic Online l Psychedelic shrooms l Mushrooms Micro-dosing USA, United Kingdom, Canada, Poland, Finland, Germany, Netherlands, Ireland, Greece, Italy, Russia, France, Peru, Portugal, Spain, Belgium. Sweden. Shrooms, mescaline, mushrooms, DMT, LSD, CODEINE, KETAMINE, IBOGA, MDMA, MOLLY.
We have put together a collection of psychedelics from different parts of the USA and test them to make up a good list of products for our clients to consume. Legal Psychedelics Online, where to buy shrooms online, Buy Psychedelics Online, where to buy magic mushrooms, and many more. Order Psychedelics from us online to acquire quality, legal and excellent products in the lives of our clients for a better and stress-free lifestyle. It is to be noted that we have a very discreet and secure end-to-end delivery system combined with the best growers of Legal Psychedelics Online USA, We are typically the most trusted connects of Psychedelic brands medication worldwide. We guarantee 100 percent client satisfaction and Money Back Guarantee. buy shrooms from us at very affordable prices. where to buy magic mushrooms and a magic mushroom grow kit.
For more information visit here : https://psychedelicrangers.com
We are a group of young enthusiasts who are out to blow the whistle on the magical healing powers of Psychedelics and all its other advantages by making this healing drugs available to everyone. We have experienced the powers of Psychedelics and we which to share this experience with everyone out there. We will try our best to help anyone in need. All our products have been tested and verified by all competent authorities
Our blog post - Psychedelicrangers
Contact us - Psychedelicrangers
FREQUENTLY ASKED QUESTIONS - Psychedelicrangers
Our Products - Psychedelicrangers
shipping return policy - Psychedelicrangers
Psychedelic Rangers Shop - Psychedelicrangers
10G Top Quality DMT Crystal | Spirit Molecule | N,N DMT
28G Dutch Champagne MDMA Crystal
just visit our site for more product or to place an order.
https://eliteaussiedoodle.com.
buy-aussie-doodle-puppies-online-in-san-francisco
aussie-doodle-puppies-for-sale-in-los-angeles
rehome-aussie-doodle-puppies-online-in-new-jersey
how-to-buy-aussie-doodle-puppies-online-in-california
Savannah Kittens
Cute kittens for sale
F2 Savannah kittens
Savannah kittens available
Serval cats for sale
Exotic animals for sale
kittens near me
Serval kittens for sale
Buy adorable kittens online
kittens available online
buy kittens online
Savannah Kittens near me
kittens for sale
cats for sale
kittens near me
F2 Savannah Kittens
honeycomb carts
real tko carts
tko cart
buy tko extracts
buy weed online global
buy weed online with cash app
Moon Rocks
Granddaddy Purple
Blue Dream Kush
Albino Magic Mushroom Growkit
Green Crack
buy weed online global
buy weed online with cash app
Moon Rocks
Granddaddy Purple
Blue Dream Kush
Albino Magic Mushroom Growkit
Green Crack
buy-botox-online-usa
buy medical wed online
white moon rocks
moon rocks for sale
moonrock strain
marathon og strain
Get best top grade AAA+ Cannabis products, medical Marijuana and Medical Cards.
buy marijuana-indica online
buy marijuana-hybrid online
buy marijuana-concentrates-cartridges-and-weed-concentrates online
buy marijuana-seeds online
buy marijuana-pre-rolls online
buy marijuana-accessories online
buy marijuana-accessories-and-vaporisers online
buy hemp-cbd-and-cbd-oils online
buy hemp-cbd-and-cbd-capsules-weed-concentrates online
"buy marijuana-grand-daddy-purple online
buy marijuana-indica online
Nice Blog !
Our experts at QuickBooks Customer Service give you the right technical support and service in the humanitarian crisis.
Rajasthan University Exam Time Table
Uniraj Exam Time Table This is really worth reading. nice informative article.
Good blog informatve for readers such a nice content keep posting thanks for sharing
maltipoo puppies for sale near me
maltipoo puppies for sale
cavapoo puppies for sale near me
buy marijuana online
buy weed online
dank vapes for sale
buy marijuana online with worldwide shipping
buy marijuana edibles online,k
smart bud
moon rocks for sale
buy cbd oil online
dank vapes for sale
order brass knuckles online
stiiizy pods
exotic carts
moon rocks weed for sale
buying weed online
buy acdc cannabis online
granddaddy purple kush for sale
buy new york city diesel
buyAK 47 Cannnabis strain online
buy 30 cannabis fat burner capsules
buy marijuana flowers online
buy sun rocks online
buy red congolese live resin online
buy pre-rolled joints online
buy cannabis trim online
buy sour diesel online
can you buy weed online
order marijuana online
buy lsd online
weed for sale
buy concentrates online
pineapple punch
buy wax online
where can i buy weed online
buy weed online usa
tko extrats
“buy psychedelics online usa
“buy weed online usa
buy weed online usa
buy psychedelics online usa
Yorkie Puppies For Sale
Micro Teacup Yorkie Puppies For Sale
Teacup Yorkie Puppies For Sale near me
Miniature Teacup Yorkie Puppies For Sale
Teacup Yorkie Puppies For Sale
Yorkshire Terrier Puppies For Sale
Are you looking for that lifelong companion that will be a perfect partner? Your search is finally over. We specialize in breeding small, teacup, toy, and miniature puppies for sale me now ready for any lovely home. They are vet checked and potty trained, mom and dad are AKC registered and have all papers: Visit Our Website: https://sunshineteacuppuppieshome.com/
teacup french bulldogs for sale
mini french bulldog puppies for sale
french bulldog puppies for sale
micro french bulldogs for sale near me
french bulldog for sale near me
miniature french bulldog puppie for sale
mini teacup french bulldogs for sale
Ångest och panikattacker kan botas!
Målet med all behandling för ångest och panikattacker är lindring av symtom.
köpa imovane i danmark
adderall pris
stilnoct online sverige
imovane köpa
what is contrave
silicon wives
sky pharmacy
atx 101 uk
macrolane buttock injections london
hydrogel buttock injections
buying vyvanse online legit
buy dermal fillers online usa
mesotherapy injections near me
xeomin reviews
Savannah kattungar till salu
Savannah kattungar till salu
katter till salu
stora katter till salu
kattungar nära mig
huskatter till salu
köp kattungar online
F2 Savannah kattungar till salu
best weed market
buy medical weed online
buy bruce banner strain-online
buy granddaddy purple weed online
buy gelato strain exotic online
buy og kush strain online
buy purple urkle strains online
buy silver haze strain online
buy white widows strain online
moon rocks for sale online
Glo Cartridges
Where to buy legal weed online
buy medical weed online
moon rocks for sale online
buy granddaddy purple weed online
buy gelato strain exotic online
buy og kush strain online
buy white widows strain online
Excellent read, Positive site, where did u come up with the information on this posting? I have read a few of the articles on your website now, and I really like your style. Thanks a million and please keep up the effective work
(English Cocker Spaniel Puppies For sale )
(teacup yorkie puppies for sale )
cane carso puppies for sale
shih tzu puppies for sale
Greate Dane puppies available
Great Dane puppies for sale
big dogs for sale
great Dane puppies near me
cute puppies for sale
puppies online
buy great Dane puppies online
harlequin puppies for sale
https://smilzshop.com
dear-worm-smilz
neon-cubes
sour-worms
full-spectrum-cbd-1000mg
sour-bears
cbd-gummies
soft-gel-cbd
cherry-cubes
apple-cubes
buy-the-best-cbd-gummies-online
smilz-colombian-coffee-premium-cbd
Your content is very inspiring and appriciating I really like it please visit my site for Satta king result also check
Sattaking
Nice post check my site for super fast Satta king Result also check Sattaking
Nice post check my site for super fast Satta king Result also check Sattaking
Nice post check my site for super fast Satta Result Result also check Sattaking and also check satta king
We have ragdoll kittens for sale. They are full of personality already. They are very playful, affectionate and love to cuddle, they are toilet trained right now. They are checked and are very healthy. They have been brought up in a clean home with other pets and young children. Check my website below to shop:
https://ragdollitters.com
LEGIT DISPENSARY SHIPPING TOP DISCRETE WhatsApp: +14154846196(https://420budmall.com/)
Are you depressed, suffering from cancer, glaucoma,
headache, insomnia, joint pains, multiple sclerosis, muscle cramps, nausea,
etc, and need the best strains of medical marijuana and cannabis products to help ease your pain ?? You have reached the perfect destination with quality herbs that guarantee a good and healthy life.
Buy carts online, Dispensary weed, Buy marijuana online, Order weed online, weed for sale, when you buy from 420budmall dispensary we do top discreet shipping and delivery to your address. Buy medical Marijuana Online. Buy thc products online, buy carts online. Buy wax shatter edibles, live resin, cbd oil etc
Buy weed online cheap, Buy cannabis products online, Buy marijuana online weed shop, marijuana buds the flower is usually consumed by smoking or vaporizing you can buy marijuana flowers in pounds from our weed store @ 420budmall.com. We have exotic weed strains like the Runtz strain, Biscotti, LA pack boys, and many orders. Skunk weed for sale Buying weed online cheap has never been this easy with the help of 420budmall.com Weed shop, You can purchase marijuana flower buds Today. The marijuana industry has always revolved around deals, even when it was only in the black market realm. Marijuana for sale online cheap, Get the strongest marijuana products on sale at 420budmall.com marijuana online shopping for less, the highest quantity weed for the least money with the high level of competition in the cannabis market.
Our marijuana dispensary is mainly focused to serve the world with the best quality marijuana and expand even further with new states starting medical and recreational programs as we will in no doubt create opportunities for everyone to be able to purchase weed online. Legit Online weed shop worldwide delivery - Marijuana for sale online cheap - Buy real kush online cheap -Purchase real weed online UK - Order real marijuana online Canada - Marijuana for sale - Marijuana dispensary shipping worldwide - Buy weed Online cheap - Legit weed dispensary shop in the USA, cheap weed online shop. Skunk weed for sale Mail order weed online UK Marijuana Dispensary USA deliveries, we deliver Mail Order marijuana products across UK, Ireland, EU, and worldwide. We offer a marijuana discreet shipping USA without being discovered. UK Mail Order Marijuana.
Buy Weed Online USA and Enjoy our vast selection of craft cannabis flowers, edibles, and concentrates from the comfort of your own home! Our goal is to provide our clients with the most secure, reliable, and safe experience when you buy weed online cheap or mail order weed online with the fastest deliveries, Skunk weed for sale Skunk weed for sale also known as AAA weed, buy skunk weed online today and have it delivered at your doorstep. top-shelf exotic weed for. Buy real weed from 420budmall.com if you want to buy some weed or how to order weed, how to order weed online, AAA weed for sale online, kali weed, Skunk weed UK, buy hash online USA, how to get free, buy AAA weed or the best quality, UK Cali, UK Cali, Cali apparel UK, buy green crack online, are there girl scout cookies in England, Cali UK, is weed legal in England, buy kush edibles UK, is weed legal in Scotland, Buy Cannabis Products Online, buy sour diesel online, tko carts, death star og, is cheap weed ca legit cookies carts, death star og, 420 bud
WhatsApp: +14154846193
Email: Watsonmuld@gmail.com
Website: https://420budmall.com/
Telegram Channel: https://t.me/joinchat/tr3QkdGPjM5hZTQx
Our parrots make a wonderful companion pet. Purchasing a pet parrot online is easy at MyMacaws Home. We sell parrots of the highest quality health and basic ability in their DNA. We have a small selection of macaw parrots for sale, Harlequin macaw parrot for sale, Blue and Gold Macaw parrot for sale and Hyacinth macaw parrot for sale. Browse wide variety of Parrots and Eggs on our Website.
dmt crystal Florida, USA
dmt drug pics Florida, USA
dmt droga Florida, USA
dmt entities wiki Florida, USA
dmt legal vendor Florida, USA
5 bromo dmt Florida, USA
dmt slang Florida, USA
dmt molecular structure Florida, USA
dmt cartridges Florida, USA
dmt pens Florida, USA
5 meo dmt buy Florida, USA
dmt the spirit molecule Florida, USA
http://smilzshop.com
clear-worm-cbd
neon-cubes
sour-worms
full-spectrum-cbd-1000mg
sour-bears
broad-spectrum-cbd-gummies-300mg
soft-gel-cbd
cherry-cubes
apple-cubes
smilz-cbd-gummies-where-to-buy
smilz-colombian-coffee-premium-cbd
apple-runtz-strain
zourz-runtz-strain
vlone-runtz-strain
sharklato-runtz-strain
runtz-strain
runtz-og-strain
money-bagg-runtz-strain
peach-kobbler-runtz-strain
hawaiian-runtz-strain
frosties-runtz-strain
ether-runtz-strain
adderall-xr
meticore
biofit
xanax
ritalin
roxicodone
suboxone-strips
oxycontin-80-mg
vyvanse
oxycodone
i have been going through different blogs out here and i must confess, this is the blog i have visited. black-runtz
All products come with manual and most of
them are still in box but not all are brand new.
These are not stolen and there’s a sales document issued for each.
We also
ship to an FFL for those who prefer it that way.
Please feel free to visit our website https://www.legitarmsdealer.com/
best weed market
buy medical weed online
buy granddaddy purple weed online
buy white widows strain online
buy gelato strain exotic online
buy og kush strain online
moon rocks for sale online
buy silver haze strain online
Top quality Cockatoo parrots looking for re-homing.
Speaks few words and young enough to learn more.
Very socialized and tame. Health and medical
certificates from our vet. just get back for more
information and pics or visit jasminepetzone.com.
For more details or pictures contact on WhatsApp : + 1 321 866 8469
nice article guys
150mg-tramadol
amf og
atomik moon rocks
ambrosia strain
blue dream vs og kush
citrix leafly
citrix strain
eleven roses strain
gorilla gas strain
pootie tang strain
pootie tang strain
laughing gym look alikes
Buy Real Driver License Online .A drivers license happens to be an official document which gives permission to different types of drivers to operate or drive different vehicles on public roads without any fears. It is usually in the form and size of a credit card. legitsdocumentts.com provides you with the opportunity to grab an authentic drivers license online without taking any tests. Here at legitdocumentts, we provide all classes and types of driving license which includes the following; Firstly, Category A. AM (Moped) Secondly, Category B. B1 (Light Vehicle Automatic) Thirdly, Category C. C1 (Light Truck) Nonetheless,Category D. D1 (Van) However, Category E. Age: 21 – 65 years (Licensed as EC1, EC, ECE, ED, ED1, ED2 and ECD3) Category F (Persons with Disability) Category G. australian drivers license for-sale fake driving license for sale So if you need a place where you can get a real driving license online, search no further because we make your dreams come true in few days. All you need to do is go to our website and place your order. Trust me we will make all your dreams come true.
At tage din medicin som foreskrevet, eller at medicinsk overholdelse er vigtig for at kontrollere kroniske tilstande,
behandling af midlertidige forhold og generelt langsigtet sundhed og velvære. En personlig forbindelse med din læge eller apotek er en vigtig del af medicinoverholdelse.
Køb imovane online Norge
Zolpidem køb online
køb imovane i sverige
Köpa Reductil 15mg i Sverige
kop sobril utan recept
kop concerta 54 mg i sverige
MDMA
Taking your medicine as prescribed or medication adherence is important for controlling chronic conditions,
treating temporary conditions, and overall long-term health and well-being. A personal connection with your health-care provider or pharmacist is an important part of medication adherence.
Kjøp imovane online Norge
köpa imovane i danmark
køb imovane i sverige
reductil
sobril uten resept
adderall sverige
///////////Simpsonchemicals\\\\\\\\\\
Okay, this is a fact.
There are little concern on the matter and people deny to put an eye to see more.
You clearly open up the discussion on the subject, and its like psychedelics.
You can buy valium online at simpsonchemicals and pay with bitcoin now. That is great.
They also have opioids for sale and you can codeine online too.
Buy Diazepam online form simpson chemicals pharmaceuticals, you can have free or buy tramadol and buy percocet too.
//////////scottishfoldkitten\\\\\\\\\\\\\\\\\\
Good, nice opening the subject on this.
Less concern with what others say, I focus on the angle of aproach. As a writer.
The best way to get inspired in by getting comfortable with your kittens. I buy from scottishfoldskittenshop.
There, you can buy Lola, buy smart Masha,
buy Multon, buy chil and chily.
Exclusively, buy Zahar for sale online there too, they are the best.
hippiestore.org
buy ayahuasca online
buy lsd online
mdma for sale USA
buy mescaline-or-peyote online
psychedelics for sale
parrots for sale uk
cockatoo for sale
african grey parrots for sale
i enjoy your blog
buy-packwoods-online-now
backwoods-cigars-for-sale
cbd-gummy-bears-2
faded-edibles
good blog
buy-packwoods-online-now
backwoods-cigars-for-sale
cbd-gummy-bears-2
faded-edibles
i enjoy reading your blog
buy-packwoods-online-now
backwoods-cigars-for-sale
cbd-gummy-bears-2
faded-edibles
Fabulous post!! Also Explore: This is a rocky undersea location known for its stretches of white sand and a large range of unusual lobsters that live in the quiet waters.
Look at Treks like: Sandakphu Trek
Chadar Trek
i must confess you guys have the best blog out here. thanks for giving me the opporturnity to place a comment here.
corgi puppy for sale near me,corgi puppies for adoption,corgi breeders near me,corgi for adoption,corgi,corgi breeders,corgi puppies for adoption,corgi mix puppies,pembroke welsh corgi puppies for sale,corgi puppies for sale in United States ,cardigan welsh corgi puppies for sale,cardigan welsh corgi puppies,corgi puppies price,fluffy corgi puppies for sale,corgi kennel,corgi puppies for sale in usa,corgi mix puppies for sale,cardigan corgi puppies,corgi mix breeds,welsh corgi for adoption under $500,corgi dog price,corgi puppies for sale
check my link used glock 19
It seems like an educational blog which always some new information to visitors Private Tutor WELLESLEY and Enjoying every little bit of it and I have you bookmarked to check out new stuff you blog post.
I love this cartridge. Be careful of your first draw if you are used to other carts! I love the orange and i find the high smooth. I am ordering a different flavor tonight.
wow am so happy for reading this amazing contents bolivia cocaine
100 hit blotter paper
blotter for sale
blotter paper for sale
LSD sheets online
LSD sheets for sale
blotters for sale
buy LSD sheets online
LSD sheets
buy acid online blotter
blotter acid for sale
k2 spray on paper
k2 paper spray
k2 paper
k2 sheets of paper
k2 sheets
liquid k2 spray for sale near me
strongest k2 spray
strongest k2 spray for sale
liquid k2 spray for sale near me
k2 liquid spray
liquid k2 spray near me
k2 spray sold near me
strongest k2 spray
strongest k2 spray for sale
strongest k2 spice spray
k2 spice powder
k2 powder for sale
buy k2 powder
k2 spice powder price
synthetic k2 powder
buy k2 powder
jwh k2 powder
how to mix k2 powder
synthetic k2 powder
k2 spice for sale
k2 powder
k2 spice liquid uk
https://nightcokesupplies.com/product-category/best-selling-illicit-drugs/synthetic-drugs/hallucinogen/
Post a Comment